It briefly summarises the steps needed to complete the quest.
Dragon Slayer is a free-to-playquest. This quest is regarded as the most difficult for free-to-play players. Upon successful completion, players gain the ability to equip the rune platebody, green d'hide body, and their variants. It was also the last quest in RuneScape to be released before the addition of membership.
A piece of silk (can be stolen from the Ardougnesilk stall (requires 20 Thieving), or bought from Thessalia for 30 coins, or from the Al Kharid silk stall for 3 coins, 2 coins if you talk to him and refuse his first offer)
Some of these creatures, which are denoted by an asterisk, there is only one of each that drops the required key. They can be noted by small differences stated in the guide.
Return to the Champions' Guild, and talk to the Guildmaster again. He will be shocked and will tell you that you will need to obtain three pieces of the map to get to the island, a boat to reach Crandor, and a shield to protect yourself from the dragon's fire.
Important: You must ask him every question you can; otherwise, you won't be able to progress in the quest.
Ask him where Melzar's piece is to obtain the maze key (must have open inventory slot), and make sure you ask him where the maps are and where to get an anti-dragon shield. The shield can be obtained from Duke Horacio in Lumbridge, or for very cheap at the Grand Exchange.
Note: To save time, make sure you talk to the Guildmaster about buying a boat (ask how you can get to Crandor and where to get a ship) before you go see Klarense in Port Sarim later in the quest. This will save you having to walk back to the Guild after collecting the map.
Obtaining the map pieces
These map pieces may be obtained in any order. When you have all three, use any piece on another piece to form the complete Crandor map.
The first piece is found in Melzar's Maze. You will need food if you have a low combat level. Melzar's Maze can be found north-west of Rimmington, south of the Crafting Guild, and west of Port Sarim. (If your house portal is located here, you may wish to teleport to house and exit portal.) To get inside of Melzar's Maze, you must use the key you get from the Guildmaster in the Champions' Guild when you've started the quest. Once inside Melzar's Maze, do the following:
Kill the small zombie rat with a long tail to get a red key. Once you have the red key, use it on the door that is most north(the room has a bookcase, poster, table and chairs in it), and go up the ladder.
You will find yourself in a room full of ghosts; kill the hooded ghost wearing a tube top and without a cape to receive an orange key. To the east of the ladder that you came up, go through the second door from the north, and go up the ladder.
You will find yourself in a room full of skeletons. Kill the skeletons with small, round shields until you get a yellow key; open the southwestern door, and go down the ladder at the end of the room.
Go down the ladder again, and again, until you find yourself in a room with two zombies and a blue door. Don't use the normal exit door. If by chance you exit through the normal door, you will have to start the maze over again. Kill the zombies until you get a blue key. Use the key on the blue door to get to the next room.
In this room, you will need to kill Melzar the Mad (level 43). For lower level mages or rangers, it might be possible to trap a spider between you and Melzar, preventing him from using his Melee attack, which causes him to do nothing for long periods of time during the fight. After you have killed him, pick up his magenta key, and use it to open the magenta door.File:Demon Melee Safespot.gif
In this room, there is a lesser demon (level 82). There is a safespot for rangers/mages and for meleers as well. For mages and rangers, stand one square to the right of the magenta door when looking north (this spot can also be used with a halberd). For meelers, lure the demon to the western part of the room, and attack it at his maximum attack range then walk one square west to make it lose interest, repeating that strategy as many times as needed (see gif to the right). Kill it to get a green key; use this key on the green door then open and search the chest to get a map part.
Then, when the Oracle is done talking, go into the Dwarven Mine with all those items. Look for a magic door in the northeastern part of the mines. It is just before you see scorpions. When you've found it, you must use all of your items on the door to open it. Open the chest and search for the second map piece.
Note: Placing the wrong items into the door or putting some in, leaving, then coming back, and putting in the rest of the items will not cancel out the items already placed in the door. Be careful not to left click your Wizard's Mind Bomb, as you will consume it rather than use it.
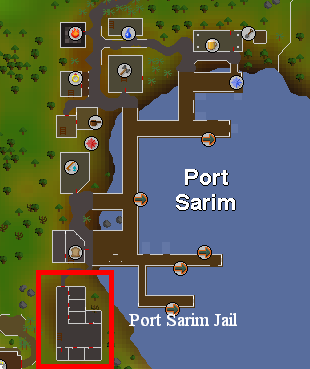
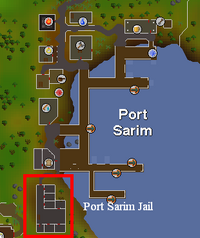
The third and final piece can be obtained by talking to Wormbrain. Use one of two different ways to get the map piece from Wormbrain, located in Port Sarim Jail.
You can attack him using Ranged or Magic. Once his health reaches zero, he will say "Ow!" and drop the map part for you to telegrab (if you bought an extra Wizard's Mind Bomb, you can drink it to boost your Magic level +2).
Alternatively, you can pay him 10,000 coins in exchange for it.
With all three map pieces, simply use two together, and they will all combine into the treasure map.
Note: You will need to talk to the Guildmaster about buying a boat before you go see Klarense, but only if you haven't asked him already.
You will need 90 steel nails and three planks. To obtain the steel nails, you can either smith six steel bars into nails (requires level 34 Smithing, which is boostable), or you can buy them from the Sawmill operator north-east of Varrock or from other players. Next, get a hammer and 2,000 coins. Go to Port Sarim and look for Klarense, a sailor. He is located on the second-most southern dock. He will sell you his boat named Lady Lumbridge for 2,000 coins. Pay him the 2,000 coins, and the boat is now yours. Go on the ship and go inside it. Repair the hole in the ship by using the planks with the hole.
Note: If you forgot your hammer, and are on a members' world, you can buy one from a Trader Crewmember on the dock to the south, travel to the Void Outpost and buy one from the general store, or you can attack the goblins to the west until one is dropped.
Do this three times, and the hole will be repaired. Next, go to Draynor Village and find Ned, the person who makes ropes for you. Ask him to be the captain and help sail you to Crandor. Make sure you have the Crandor map in your inventory, or you will need to retrieve it from your bank. He will agree and tell you to meet him on your ship.
Now, it is time to prepare. Equip the Anti-dragon shield, some armour, and a weapon. Elvarg is weak against stab attacks as well as Ranged, so consider bringing an adamant sword or dagger, or (if a member and 60 Attack) a dragon dagger, or your best crossbow with the best bolts you can use. Elvarg is not immune to poison, so adding weapon poison will make the battle go much smoother, thus a dragon dagger (p++) would be superb. The rest of your inventory should be filled with food; lobsters or swordfish should do. Swordfish are preferable to lobsters since they heal more per bite (14 vs 12), but with a combat level of around 40 and appropriate gear, you should be able to easily defeat Elvarg with just lobsters. If your stats are lower, you can buy or cook meat pizzas or anchovy pizzas with level 45 Cooking to bring as they heal more Hitpoints per inventory slot, but require a second bite to consume. A meat pizza heals 8 HP per bite (16 total) while an anchovy pizza heals 9 per bite (18 total).
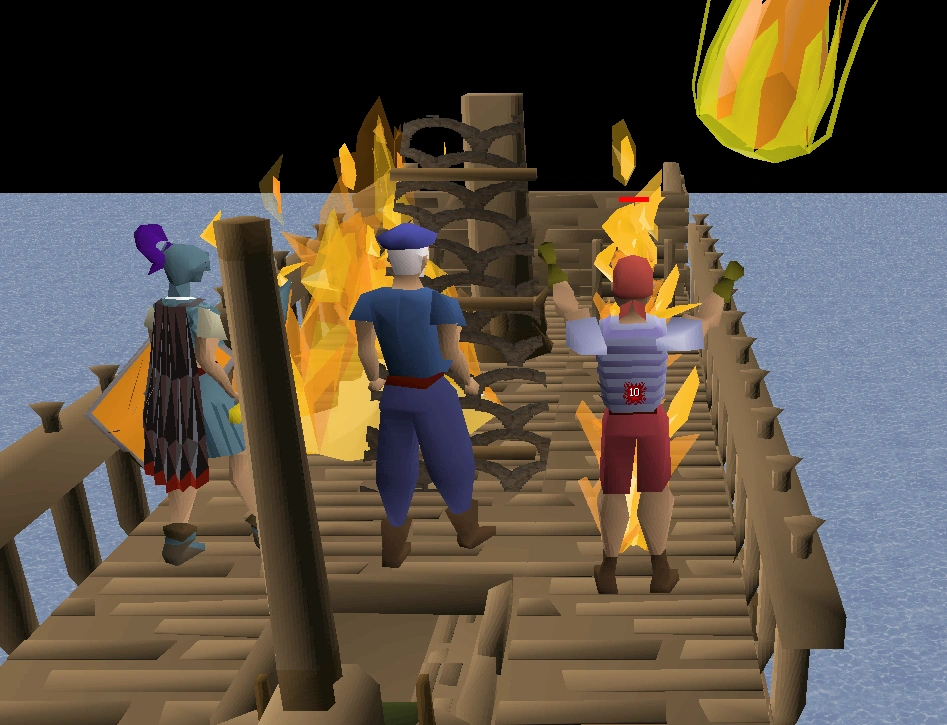
A reason why good defence and dragonfire protection is needed to face Elvarg.
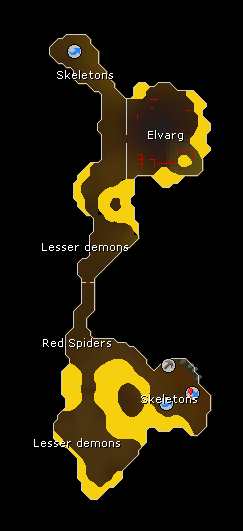
Go to your ship and sail to the island Crandor. After crashing on the island, make your way through the island to the top, avoiding the monsters there. You'll see stairs behind some lesser demons. Run past them, and go down the stairs. You'll be in a cave surrounded by skeletons. Keep walking and you'll see Elvarg behind a door in a room.
Before you enter the room, make sure that your anti-dragon shield is equipped. Also, if you go south a little further past the lesser demons, you should see a wall with an open option. Push it to go through and unlock a shortcut back to Elvarg in the event that you die or teleport away. Now, go in and fight Elvarg.
Battle strategies
Consider having Protect from Magic activated as Elvarg's Fire Blast-like, magical attacks hit high. Again, using a stab weapon like a dragon dagger (p++) is a good idea since dragons are weak to stab. If you also use Ranged on the dragon, make sure you are using a one-handed weapon such as a crossbow, unlike a bow, which is two-handed. With a crossbow, you are still able to equip the anti-dragon shield necessary in the quest.
If you are using magical attacks, make sure you are using tier-2 Magic (i.e. Bolt spells such as Wind Bolt, Water Bolt, etc.) or higher and can equip the anti-dragon shield. Also, bring teleportationrunes just in case you are about to die.
It is important to note that if you use an anti-dragon shield, as well as a drinking a dose of antifire potion, Elvarg can only hit a maximum of 7 (3 or 4 if combined with Protect from Magic) with her magical attack instead of 11, thus saving you a lot of food.
If you are around 35 Defence, or more, it may be advised to stand next to Elvarg, rather than safespotting, as her mage hits can easily outweigh her melee hits. It is also advised to stand under her while you eat, as it will save food by not getting hit whilst you can't hit.
Lower levels and iron men without antifire potions are advised to use a ring of recoil, as Elvarg's fast hits make it particularly useful in dealing back damage.
If you die or teleport away, you will need to repair the boat again, unless you open the shortcut. If you did open the shortcut, you will not be able to travel to Crandor again by boat. You must use the entrance underneath Karamja Volcano.
If you happen to teleport away, Elvarg will not heal if you go back quick enough. So, if you get her down low enough and leave, she will still be injured, making her much easier to kill the second time around.
Finishing up
Once Elvarg is defeated and you have triumphed, slice and collect Elvarg's head. Either teleport out, or go through the shortcut and past the deadly red spiders, to the south east of the dungeon where the skeletons are, and climb up the hanging rope to arrive on top of karamja volcano. From here, journey to your victory and head to Edgeville, straight to Oziach with Elvarg's head in order to prove your feat (although the head is not required in order to complete the quest).
When speaking to Oziach at the start of the quest he asks you how you found out he sells the rune platebody. If you reply 'I am a master detective', and having completed the Murder Mystery quest, your character will exclaim that they even solved the Sinclair murder mystery all by themself.
When speaking to Duke Horacio during 'The Lost Tribe' quest Sigmund mentions to him that you are the same adventurer who defeated Elvarg.


 Quest points