Zulrah is a level 725 solo boss. The only way to get out of Zulrah's shrine is through victory, death, logout or teleportation.
Note: Should you die in the fight with Zulrah, Priestess Zul-Gwenwynig will hold all of your items that were not protected upon death, making the fight extremely safe. However, if you die anywhere a second time without returning to her to reclaim your items, all items she was holding from your first death will be lost.
General strategy[]
When fighting Zulrah's serpentine form (green), he will only attack with Ranged, so use Protect from Missiles. When facing his tanzanite form (blue), use Protect from Magic; while this form can also attack with Ranged, he will usually use Magic instead. Zulrah's magma form (red) attacks with special Melee, which can be avoided, so you do not need to use Protect from Melee.
The form Zulrah switches to after the first (green) form will decide his behaviour for the rest of the kill. The legacy behaviour most will be familiar with (pre-update) is the following: Zulrah will switch to the red Melee, and then the turquoise Magic, and retain his original fighting style. Zulrah can now also switch to the green Ranged or turquoise Magic form immediately after his beginning form, indicating he will use the post-update techniques.
If Zulrah's second form is green, Zulrah will spawn an additional cloud of smoke to the east during his Melee form (red), thus making no safespots whatsoever on the east side of the island. The player should make their way to the west side of the island where one location will not have smoke. In addition, Zulrah will also use Melee attacks after spawning the smoke clouds. This form seems to force the player east and west constantly.
If Zulrah's second form is blue, Zulrah will often spawn clouds in a form, and then proceed to attack (instead of the other way around). In this fight, you will also notice a green Zulrah will spawn east and alternate attacks, and the green Zulrah to the west will use strictly Ranged (this is opposite to how Zulrah fights during the legacy style).
Forms[]
Throughout the fight, Zulrah will continually dive into the swamp, sending out a plethora of attacks before doing so. He will then emerge in a different area of the shrine in a different form and resume his attacks.
Even though Zulrah has no Melee Defence on any form, Melee is discouraged as he has a melee damage reduction, and halberds are the only weapons that can reach him. He can summon snakelings and/or throw toxic fumes in any form.
Note: Zulrah will attack for a set amount of time before diving back into the swamp and reappearing in another area, in a different combat style.

- The fight will always begin with the player in front of Zulrah in his green form, and start the battle in the north. Zulrah attacks with Ranged only, with the few exceptions such as one phase in the second rotation (attacking randomly) and at/near the end of every phase where he will attack with both Ranged and Magic in a set pattern. While in this form, Zulrah is weak against magical attacks.

- Zulrah will randomly attack with both Magic and Ranged, although he seems to favour magical attacks more often. While in this form, Zulrah gains increased magic resistance but is weaker to ranged attacks.

- During the magma form, Zulrah will stare at the player's position for several seconds before whipping his tail at that area. If the player does not move away from the targeted area in time, they will be dealt with up to 30 damage and be stunned for several seconds. While in this form, Zulrah gains increased magic and ranged resistance. However, he is still weak to magic attacks.
Snakelings[]
Snakelings are monsters that Zulrah will summon during the fight via white orbs. Despite their moderately high combat level of 90, they only have 1 Hitpoint. However, they should not be underestimated as they are very accurate, can hit up to 15 relatively often, and envenom the player. Snakelings attack with both Magic and Melee. Player can use Protection prayers to block all damage from snakelings. It is highly recommended to bring a ring of recoil or suffering (with ring of recoil charges on it) to kill off the Snakelings.
While Snakelings spawn immediately, Zulrah will occasionally throw a white orb and then dive into the swamp. The summoned snakeling will not appear until Zulrah reemerges from the swamp.
If you are hiding from Zulrah and he throws toxic fumes/summons additional snakelings, it is best to kill them off so you will save some food in the process.
Setup[]
Ideally, the best set-up entails using both Ranged and Magic. A Magic or Range only based method is possible, although it will significantly decrease your kills per hour. Beginners may find it easier to bring fewer Magic/Ranged switches until they are comfortable with Zulrah's mechanics and phases. Zulrah is only weak to Ranged while in tanzanite (blue) form; therefore, it is best to opt for a Magic-based approach.
Due to Zulrah's high Magic level, a Twisted Bow is very effective against it, and can completely negate the need for a Magic switch, allowing for much more inventory space and possibly more kills per trip.
A Serpentine helm is very useful for its immunity to Venom, despite it having negative Magic and Ranged bonuses. It prevents the need for Anti-venom+ potions, therefore freeing up an inventory slot, but overtime it's less cost efficient than the potions, considering it needs to be charged with Zulrah's scales. It's recommended for beginners to wear the Serpentine helm until they are able to kill Zulrah consistently, but should be swapped out overtime for something better.
For banking and teleportation, there are several ways to do so:
- Teleport to house tablet along with an ornate rejuvenation pool in the player's Superior Garden can be used to quickly restore stats, then using a ring of dueling in the player's jewellery box in their Achievement Gallery to bank at Castle Wars or the Crafting Guild, then returning to their house and using the fairy ring (code BJS) to reach Zul-Andra. Doing so requires level 76 in Agility, as it is required to cross the stepping stone (boosts can be used).
- Zul-andra teleport scrolls will take you directly next to the dock, which is about 20 seconds faster than using the Fairy ring. Despite their high cost, they are always worth using once you are able to kill Zulrah consistently without as many deaths, because the price is offset by the extra kills per hour.
- Players with lower level Construction can use a ring of dueling to teleport to Clan Wars, restock with the bank chest, and enter the free-for-all white portal to the west to instantly cure venom, restore Hitpoints, and recharge Prayer upon leaving.
- Players can also use a Quest point cape or Slayer ring teleport to quickly reach a fairy ring. Alternatively, Salve Graveyard Teleports or their magic tablet variants can be used to reach a fairy ring quickly as well. This too requires level 76 in Agility.
- If the player cannot use the agility shortcut, bring a Camelot teleport instead and run south-east to Catherby's docks and charter a ship to Port Tyras. This will require 3,200 coins (1,600 with Cabin Fever/Ring of Charos or 800 with both).
- Players can also use a Quest point cape or Slayer ring teleport to quickly reach a fairy ring. Alternatively, Salve Graveyard Teleports or their magic tablet variants can be used to reach a fairy ring quickly as well. This too requires level 76 in Agility.
Suggested skills[]
- 80+

- 80+

- 70+

- 80+

- 44+ (Eagle Eye, 45 Mystic Might)
- 82+ (In order to boost for Ornate rejuvenation pool)
Equipment[]
| Slot | Item (most effective → least effective) | ||||
|---|---|---|---|---|---|
| N/A | |||||
| N/A | N/A | ||||
| N/A | N/A | ||||
| N/A | |||||
| N/A | |||||
| N/A | N/A | ||||
| N/A | |||||
| N/A | N/A | N/A | |||
- References
Ancestral/Armadyl[]
Inventory[]
- Toxic blowpipe (for Ranged switch - loaded with Adamant darts or better) or Armadyl/Rune crossbow
- Twisted bow or Dark bow are useful for getting the final hit on Mage phases, as it is technically more DPS, although it requires more attention and isn't really necessary
- Armadyl helmet
- Armadyl chestplate
- Armadyl chainskirt
- Necklace of anguish
- Ava's device (to retrieve ammo from Ranged switch - not necessary if already wearing)
- Barrows gloves (for Ranged switch if wearing Tormented bracelet)
- Pegasian boots
- 1 Ranging potion
- 1 Anti-venom+
- 1 Prayer potion
- 1 Ring of dueling (for Clan Wars teleport to restore stats post-kill, Construct. cape or Teleport to house tabs can be used if using Ornate rejuvenation pool )
- 1 Imbued heart or Magic potion
- Zul-andra teleport scrolls or Quest point cape for a close teleport to a Fairy ring if you have 76 Agility for Zul-andra shortcut
- Rune pouch to cast Vengeance or Iban Blast if using Iban's staff
- 4+ Cooked karambwan to combo eat at low Hitpoints
- Rest monkfish or better
Note that all the listed Ranged switches can be substituted out for cheaper items, such as Blessed dragonhide armour.
Void[]
Inventory:
- Void ranger helm (for Range switch)
- Toxic blowpipe (for Range switch)
- Ava's device (if not already wearing one)
- Pegasian boots
- Necklace of anguish
- 1 Ranging potion
- 1 Ring of dueling (for Clan Wars teleport to restore stats post-kill)
- 1 Anti-venom+
- 1 Prayer potion
- 1 Imbued heart (optional for increasing magic level, if not used replace with food or Magic potion)
- 1 Rune pouch with runes to cast Vengeance or Iban's Blast if using an Iban's staff
- 4+ Cooked karambwan for combo eating when at low Hitpoints
- Rest Monkfish or better
| Slot | Item (most effective → least effective) | ||||
|---|---|---|---|---|---|
| N/A | N/A | ||||
| N/A | N/A | ||||
| N/A | N/A | ||||
| N/A | |||||
| N/A | |||||
| N/A | N/A | N/A | N/A | ||
| N/A | N/A | ||||
| N/A | |||||
| N/A | |||||
| N/A | N/A | N/A | |||
Inventory[]
- Toxic blowpipe (For spec to restore health during Mage phase, preferably with Rune Darts or better so you don't lose much DPS)
- 1 Ranging potion
- 1-2 Anti-venom+
- 1 Prayer potion
- 4+ Cooked karambwan to combo eat at low Hitpoints
- 1 Ring of dueling (for Clan Wars teleport to restore stats post-kill)
- 10+ Zul-andra teleport
- Rune pouch with runes to cast Vengeance
- Rest Sharks or better for longer trips
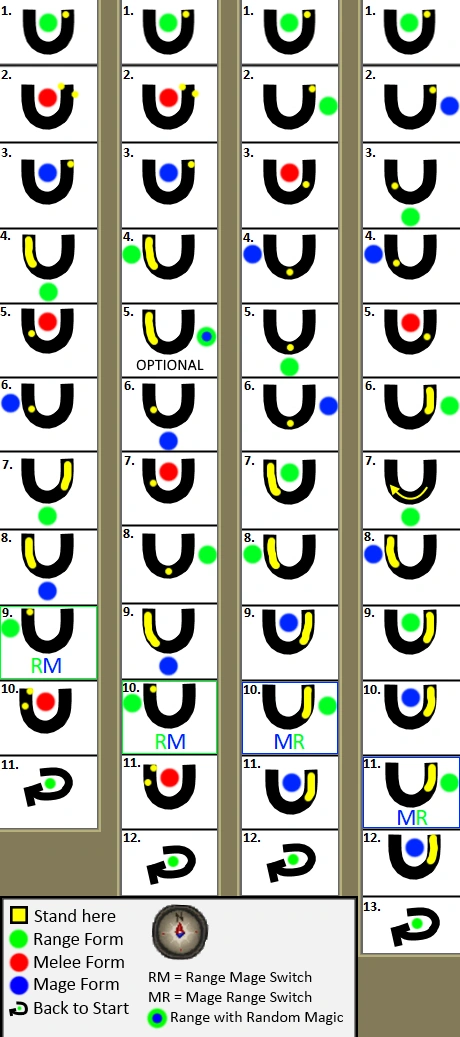
Fight overview[]
Each column in the image corresponds to one of Zulrah's patterns, and each row indicates a step in its particular pattern. The red, green, and blue circles indicate Zulrah's form and position in each step.
Always use Protect from Missiles (serpentine) or Protect from Magic (tanzanite) when fighting Zulrah, as his attacks are very accurate and often hit very hard. They are capable of hitting high in the 40s and with the high damage of the snakelings, can easily combo a player in seconds. The only exception for Zulrah's serpentine form is his "Jad" Form, where you will need to alternate between Protect from Missiles and Protect from Magic after every attack he performs.
At the start of the fight, Zulrah will pick one of the four patterns (see picture). It takes him about three minutes to complete each pattern. When he finishes the pattern, he will then pick another pattern; this may be the same as the first pattern he used in the battle.

All patterns[]
At the start of the fight, Zulrah is always in his serpentine form in the middle of the shrine. He will never attack directly at the start; rather, he will fill the area with venom clouds, leaving the tips on the east and west sides clear. After filling up the area with venom clouds, he dives into the swamp and starts one of the four patterns.
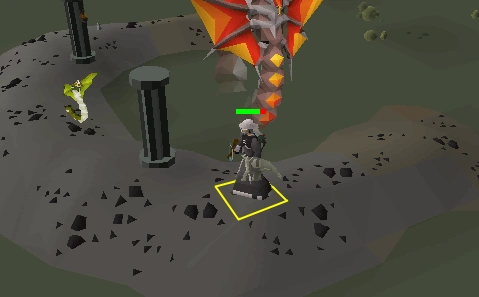
The safespot to evade Zulrah's melee form is in the square highlighted in yellow. The other safe-spot is in the equivalent space beside the other pillar.
If Zulrah finishes the pattern he was using, he will return to this step again. However, he will attack the player with ranged for several attacks before filling the area with venom clouds.
[]
Patterns 1 & 2[]
After filling the shrine with venom clouds, Zulrah dives back into the swamp and reappears in the same spot in his magma form. He will use two melee attacks before diving back down, appearing at the same spot in his tanzanite form.
When he performs enough attacks in his tanzanite form, Zulrah dives back into the swamp and the patterns separate until the second-to-last step in the pattern.
In this second-to-last step, Zulrah appears to the west in his serpentine form, attacking in a set pattern. He will start with a ranged attack, then follow up with a magic attack. At the end of this step, Zulrah fills the shrine with venom clouds, leaving the tips on both sides clear of them.
At the final step of these patterns, Zulrah appears in the middle in his magma form and uses two melee attacks before returning to the start of his attack pattern.
Patterns 3 & 4[]
In these patterns, Zulrah's initial steps are different, though the last three steps are similar to each other.
In Pattern 3, right before the second-to-last step, Zulrah will send out snakelings; in Pattern 4, he does not do this. Regardless, the mechanics are still the same in that step.
In this second-to-last step, Zulrah appears to the east in his serpentine form, attacking in a set pattern again. This time, he starts off with magic first, before following up with a ranged attack. Zulrah does not send out venom clouds at the end of this step and simply dives back into the swamp when he finishes.
At the final step of these patterns, Zulrah appears in the middle in his tanzanite form, summoning four snakelings (two on each side) before returning to the start of his attack pattern.
Pattern overview[]
Pattern 1[]
Pattern 2[]
- Step 1: Zulrah appears in the middle in his magma form, attacking twice with Melee.
- Step 2: Zulrah reappears in the same spot, this time in his tanzanite form.
- Step 3: Zulrah appears to the west in his serpentine form, spewing out venom fumes to the east, before summoning several snakelings.
- Step 4a (Optional) - with the 15 October 2015 update, Zulrah may appear to the east in his serpentine form, attacking randomly with Ranged and Magic, much like his tanzanite form. This does not happen most of the time; though it is very easy to hide from this form if needed. Zulrah returns to his normal attack pattern (next step below) after this step.
- Step 4b (original) - Zulrah appears to the south in his tanzanite form. Before the end of this step, he will spew venom fumes to the east and south, and summon a few snakelings.
- Step 5 - Zulrah appears in the middle in his magma form, attacking twice with Melee.
- Step 6 - Zulrah appears to the east in his serpentine form.
- Step 7 - Zulrah appears to the south in his tanzanite form. At the end of this step, he will spew venom fumes covering the south and east, and summon a few snakelings.
- Step 8 - Zulrah appears to the west in his serpentine form, attacking first with Ranged before following up with Magic. He will repeat this several times. When he is finished, he will spew venom fumes covering the whole shrine, leaving the tips on the east and west clear of them.
- Step 9 - Zulrah appears in the middle in his magma form, attacking twice with Melee. You should be on the tip to the west, and dodge the first attack by running into the venom clouds. Stay in the venom clouds until Zulrah turns position; if you run back to the tip too fast, Zulrah will retarget that spot, and you will have to tank a bit more from the clouds.
Pattern 3[]
- Step 1: Zulrah appears in his serpentine form to the east, immediately attacking with Ranged. At the end of this step, he will summon several snakelings before diving back into the swamp.
- Step 2: Zulrah appears in the middle in his magma form, spewing out venom fumes at the north-east, south-east and western parts of the shrine. He will then summon several snakelings before attacking twice with Melee.
- Step 3: Zulrah appears to the west in his tanzanite form.
- Step 4: Zulrah appears to the south in his ranged form.
- Step 5: Zulrah appears to the east in his tanzanite form.
- Step 6: Zulrah appears in the middle in his serpentine form. He will launch venom fumes covering the eastern and southern areas of the shrine. When he finishes with that, he will summon several snakelings.
- Step 7: Zulrah appears to the west in his serpentine form.
- Step 8: Zulrah appears in the middle in his tanzanite form, attacking normally. At the end of this step, he covers the west side in venom fumes and summons snakelings.
- Step 9: Zulrah appears in the east in his serpentine form, attacking with Magic first before following up with Ranged. He will repeat this several times.
- Step 10: Zulrah appears in the middle in his tanzanite form, summoning 4 snakelings.
Pattern 4[]
- Step 1: Zulrah appears in his tanzanite form to the east, summoning several snakelings before attacking normally.
- Step 2: Zulrah appears to the south in his serpentine form.
- Step 3: Zulrah appears to the west in his tanzanite form.
- Step 4: Zulrah appears in the middle in his magma form.
- Step 5: Zulrah appears to the east in his serpentine form, spewing the west and south side of the shrine with venom fumes.
- Step 6: Zulrah appears to the south, attacking normally. At the end of this step he will summon several snakelings, and cover the south and east sides of the shrine in venom clouds. Stay in the east until he starts sending out venom fumes; at this point, make your way to the west side.
- Step 7: Zulrah appears to the west in his tanzanite form.
- Step 8: Zulrah appears in the middle in his serpentine form for a brief time.
- Step 9: Zulrah stays in the same place, this time in his tanzanite form. He will spew out venom clouds covering the west and southern areas in venom fumes. No snakelings are summoned in this step.
- Step 10: Zulrah appears to the east in his serpentine form, attacking with Magic first before following up with Ranged. He will repeat this several times.
- Step 11: Zulrah appears in the middle in his tanzanite form, summoning 4 snakelings.